12.- Layers>
New Raster Layer
13.- Dragonfly Plugin> Sinedots 2
according to printe
- 14.- Image>
Vertical Mirror and with the Pick
Tool, hit until you reach the tips
15.- Layers> New Raster Layer
16.- Again the Dragonfly Plugin>
Sinedots 2 according to printe
17.-
With the tool Pick Tool light right to left
18.- Merge Down
19.- Apply Drop Shadow = 0 - 0 - 80 - 10,00
in black color
and leave it as printe
-
20.- Adjust> Sharpness> Sharpen and
Opacity = 60 or 80%
21.- Layers> New Raster Layer
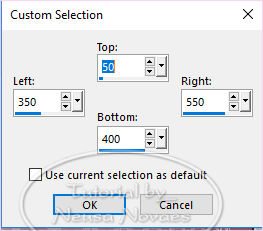
22.- Activate the selection tool and
configure Custom Selection according
to printe

-
23.-
Selections> Modify> Select Selection
Borders = Both Clicked Sides and 2px
24.- Fill with white color
25.- Effects> Inner Bevel according
printe
- 26.- Take
the selection and double
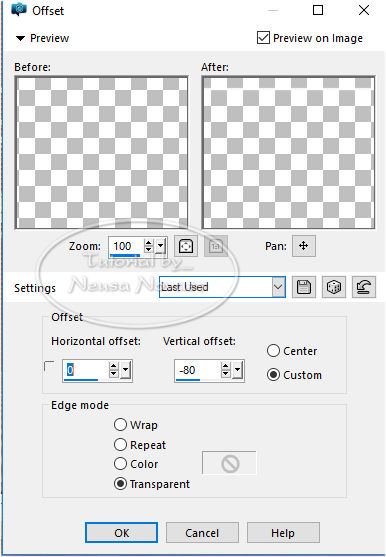
27.- Effects> Image Effect> Offset
according to printe
28.- Duplicate and
reapply OffSet two more times
29.- Merge Down by 3 times
30.- Open, copy and paste as new layer
the text
31.- Position it according to model
32.- Open, copy and paste as new layer
deco_NCN_0150
33.- Place according to model
34.- Open, copy and paste as new layer
your tube
35. Apply Drop Shadow to taste
(depending on your tube can give Opacity
if you want)
36.- Layers> New Raster Layer
37.- Activate the selection tool and
configure Custom Selection according to
printe
38.- Open, copy
and paste into selection the bar, place
under the pictures with the text
(You can give Layers> Arrange> Move Down
4 times if you want)
39.- Apply again drop shadow to taste
and take the selection
40.-Enable Raster 1
41.- Activate the selection tool and
configure the Custom Selection according
to printe
42.-
Promote Selection to Layer - Take Selection
and Duplicate
43.- Effects> Image Effect> Offset according
to printe

44.-
Repeat items 40 and 41 and Merge Down 2
times and select all
45.- Selections> Fload and Defload
46.-Open, copy and paste into selection
again your tube
47.- Alien Eye Plugin Candy5 Impact> Glass>
Clear as it opens
48.-Unselect and Layers> Arrange> Bring to
Top
49.- Opacity = 80%
50.- Layers> New Raster Layer
51.- Fill with Linear Gradient 90 x 15
52.- Plugin Muras Meister> Perspective
Tiling and only in the Height place 30
53.- Plugin Unlimited> Render> Smoke as it
opens
54.- With the Pick Tool, go down a little to
release the
55.-Place under your main tube and Merge
Visible
56.-Image> Add Border = 3 px dark color
57.-Selections All
58.-Image> Add Borders = 40px contrasting
color
59.- Selections> Invert
60.-Mehdi Plugin> Wavy Lab 1.1 with the same
configuration
61.-Effects> Texture> Blinds with the same
configuration
62.-Plugin AP Lines> Silverling with the
same configuration 2 times
63.-Selections> Invert and apply Drop Shadow
to taste and take selection and
Image> Add Border = 3 px dark color again
64.-New Layer and fill in white
65.-Apply Narah_mask_0397 (1)
66.-Merge Group - Opacity = 20%
67.-Apply Drop Shadow to taste and Enhance
68.-With the Pick Tool, reduce it so that it
is the size of the first frame
69.- Open, copy and paste as new layer
deco_NCN_0151
70.-Put your signature and mine and Merge
Visible
71.-AAA Filters Plugin> Custom = Landscape =
OK
72.- Save your art in jpg

NOTE: - Do not forget to put the credits to
the right ones.
** Tutorial created by Neusa Novaes *
October 16, 2018
Copyright reserved.
Prohibited total or partial transfer,
copies, alterations
publication in websites or blogs, without
author's authorization.

Credits
Main Tube and Version: - Grisi and received
from Misae
Mask: - Narah Pamplona
Deco and Text: - Neusa Novaes