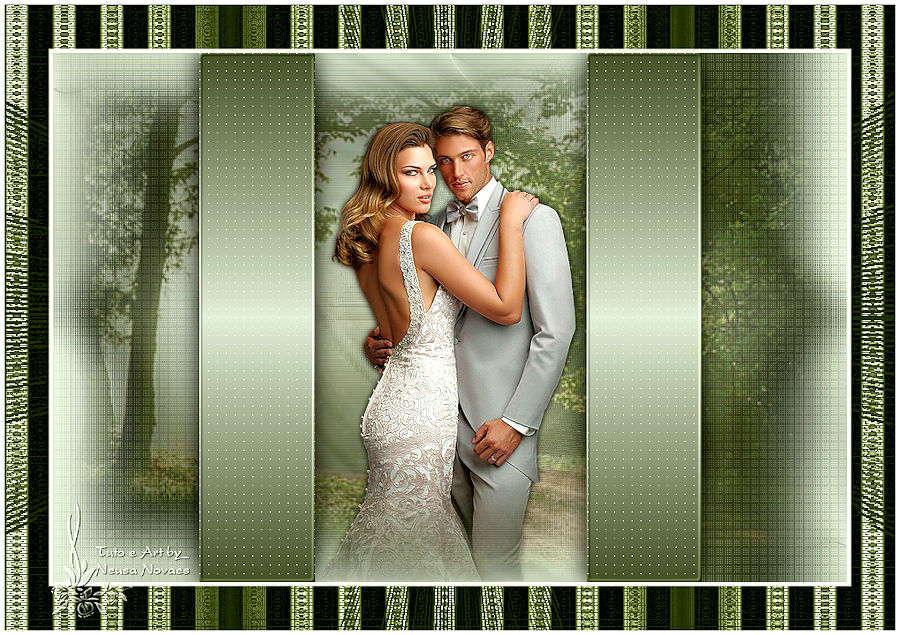
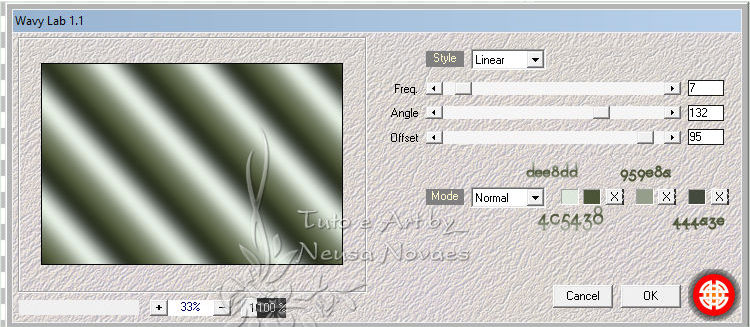
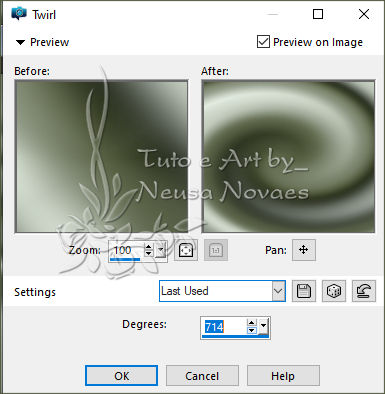
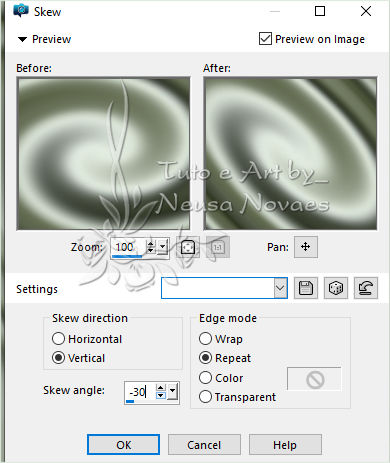
• 2 Tubes
    Mehdi Plugin
    Plugin & BKG Kaleidoscope
    FunHouse Plugin
    Krusty´s FX volt II 1.0 plugin
    AAA Filters Plugin

  • EML Tutorial HERE
    Video HERE
    PSP Effects

    Script

    Click on the butterfly to follow the tutorial


  • Let's start!!!
  • 1.- I put it in Foregraund # dee8dd and Backgraund # 4c5438
    Let's make a Linear gradient being 0 - 1

    2.-Open a 900 x 600 px transparency

    3.- Mehdi Plugin> Wavy Lab 1.1 as shown
     
    4.-Image > Seamless Tiling = Default sendo na /transition = 100
     
    5.-Distortion Effects > Twirl conforme printer Opacity = 80%
     
    6.-Layers> New Raster Layer and Layers> Arrange> Move Down

    7.- Fill with your gradient (don't forget to invert the colors)

    8.-Activate Raster 1

    9.- Geometric Effects> Skew as shown
     
    10.-Enhance and Duplicate

    11.-Plugin & BKG Kaleidoscope> @BlueBerry Pie as shown
     
    12.-FunHouse plugin> Loom as printed 2 times
     
    13.-Layers> New Raster Layer

    14.-Selections> Load Save Selection and locate sel_grande_amor_1 and click OK

    15.-Fill with your gradient

    16.-AP Lines Plugin> Silverling as shown
     
    17.-Apply Drop Shadow = 0 - 0 - 100 - 40.00

    18.Selections> Modify> Select Selection Border = 3 px - Inside and Anti Alias clicked

    19.-Inner Bevel as shown
     
    20.-Remove selection and activate copy of raster 1

    21.-Selections> Load Save Selection and locate sel_grande_amor_2 and click OK

    22.-Penta Plugin> Dot and Cross = Default

    23.-Remove the selection and Layers> New Raster Layer

    24.-Selections

    25.-Open, copy and paste into selection the landscape tube

    26.-Opacity = 60% and unselect

    27.-Image> Add Border = 5px in white

    28.-Image> Add Border = 50px in the color that matches

    29.-With the magic wand select the 50 px

    30.-Open, copy and paste into selection the landscape tube again

    31.-Adjust> Blur> Gaussian Blur = 50.00

    32.-Krusty´s FX volt II 1.0 Plugin> Pattern Generator I (Fabric.2)
    as you can (depending on your color, change the colors of the plugin)
     
    33.-Image> Add Border = 5px in white

    34.-Remove selection

    35.-Open, copy and paste the main tube in a new layer

    36.-Resize and position it to taste

    37.-Adjust One Step Photo Fix (Optional)

    38.-Sharpen and shade to taste

    39.-Put your brand and mine

    40.-Image Resize = 900 px

    41.-Pulin AAA Filter> Custom> Landscape

    42.-Save in JPG


  • ** Tutorial created by Neusa Novaes **

  • June 4, 2020

  • Copyright reserved

    Any similarity is purely coincidental.

    Total or partial transfer, copies, alterations prohibited
    publication on websites or blogs, without authorization from the author.

    NOTE: - Do not forget to place the credits to those entitled
  •  
     
     Crédits 
     
    Tube: -Mine and Received exchange group