bgcolor="#538958" cellspacing="5">


Roses Top


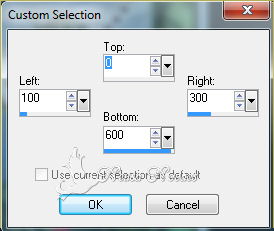
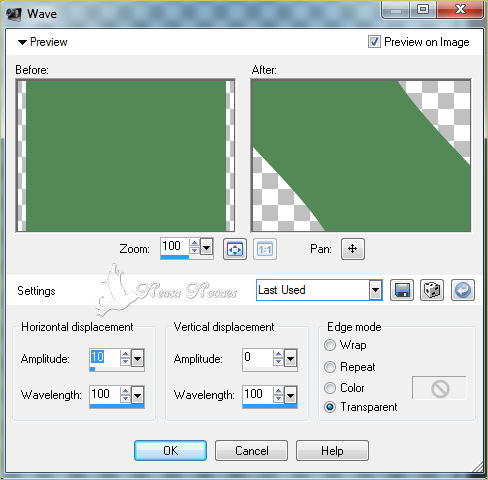
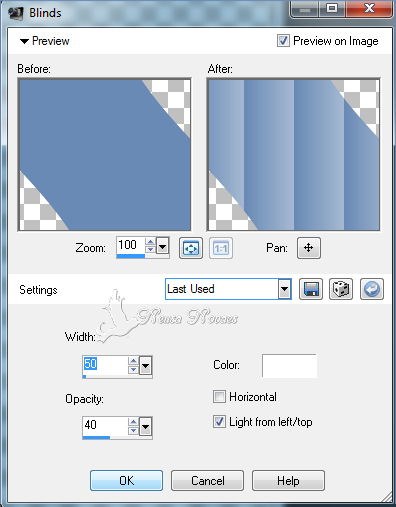
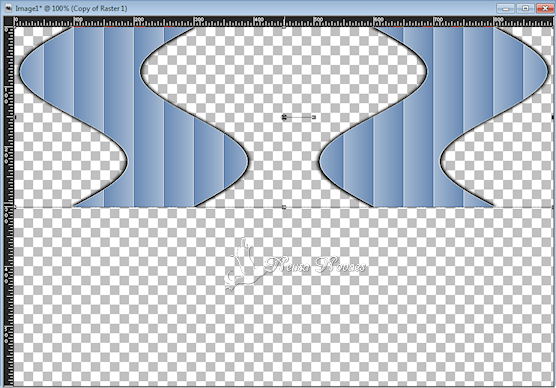
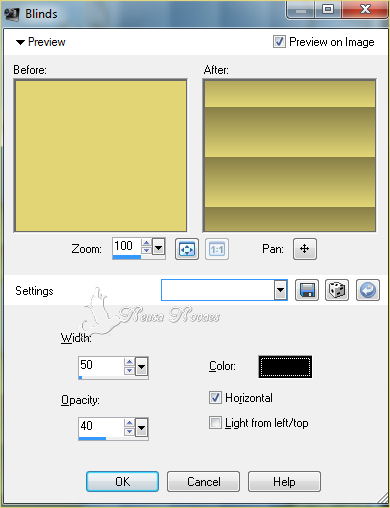
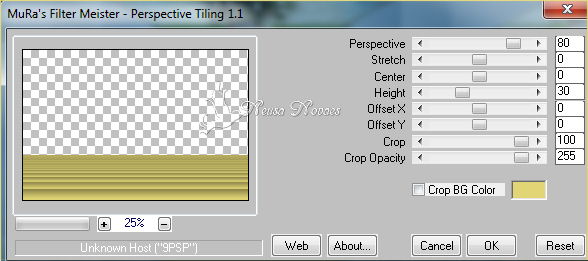
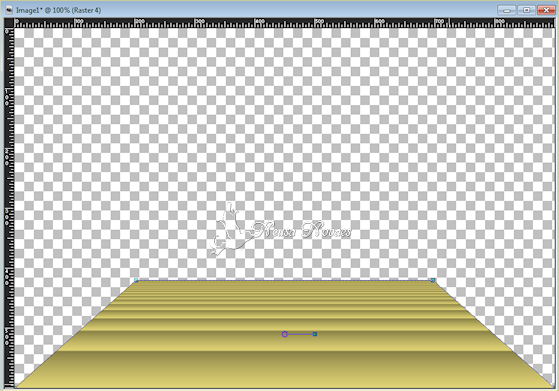
Terms of use

Click on the flag of your country, for translation.
Depending on your connection the translation may take a while


2 or 3 Tubes
1 Decoration
Muras Meister Plugin
Redfield Plugin
Material
HERE
Eml Tutorial
HERE
Video Tutorial HERE
Watermark Here
PSP Effects


1- Open a transparency 900 x 600 px

2- Open your tube and take two colors to make a gradient
(I chose Foregraund colors # 538958 and Backgraund # c5be64)

3- Selection tool> Custom Selections as printe


4- Fill in a solid color I chose color # 6288b5
  
5- Selections> Select None
  
6- Effects> Distortion Effect> Wave conform printe


7- Effects> Texture Effect> Blinds conform printe
  
8- Effects> Edge Effect> Enhance

9- Effects> 3D Effect> Drop Shadown Negative and Positive> 2 - 2 - 80 - 10,00
  
10- Layers> Duplicate
  
11- Image> Mirror
  
12- Layers> Merge> Merge Down
  
13- With the Pick Tool tool from the bottom up take up to 300 px according to printe
  
14- Layers> Duplicate again
  
15- Image> Flip and then Layers> Merge> Merge Down
  
15- Effects> Image Effect> Seamless Tiling = Default
  
16- Open your landscape tube Edit> Copy
  
17- Edit> Paste as New Layer
  
18- Layers> Arrange> Move Down
  
19- Effects> Image Effect> OffSet = 0 - 190 - Transparent
  
20- Open your other landscape or floral tube and place it under both sides
  
21- Layers> New Raster Layer
  
22- Fill in solid color # e2d576

23- Effects> Texture Effect> Blinds conform printe

24- Plugin Muras Meister> Perspective Tiling according printe

25- With its tool Pick Tool mode Perspective take up to 200 px according to printe
 
  
26- Activate Magic Wand = Feather 20 and select the transparent part

Edit> Cut 4 times and deselect

28- Layers> New Raster Layer
  
29- Layers> Arrange> Move Down
  
30- Fill with your Foregraund
  
31- One Step Photo Fix (optional on all layers)
  
32- Layers> Merge> Merge Visible
  
33- Make a Linear gradient 45 - 10 (with the chosen colors)
  
34- Image> Add Border = 5px white color
  
35- With the Magic Wand Feather tool = 1 and select the white border
  
36- Fill with your gradient
  
37- Still selected Effects> 3D Effect> Inner Bevel as printe

  
38- Selections> Select None
  
39- Open your main tube Edit> Copy
  
40- Edit> Paste as New Layer and position to taste
  
41- Apply a light shade
  
42- Image> Add Border = 40 px white color
  
43- Activate the Magic Wand tool and select the white border

44- Fill with your gradient
  
45- Redfield plugin> Lattice Composer according printe
 
  
46- Selections> Invert
  
47- Effects> 3D Effect> Drop Shadow negative and positive = 5 - 5 - 100 - 30,00
  
48- Selections> Select None
  
49- Image> Add Border = 5px white color
  
50- Select the border and fill in with your gradient
  
51- Apply the Inner Bevel as previously
  
52- Open your deco Edit> Copy
  
53- Edit> Paste as new layer and garnish to taste
  
54- Layers> Merge> Merge Visible
  
55- Image Resize 900 x 630px
  
56- Put mine and your brand


NOTE: - Do not forget to put the credits to whom right


** Tutorial created by Neusa Novaes **
September 23, 2014


Copyright reserved
Prohibited total or partial transfer, copies, alterations
publication in websites or blogs, without author's authorization.


  Credits

Tubes Top: Jolcsi and Mary
Tubes Version: - Grisi, Jolcsi, Luz Cristina and Maxou
Tutorial by_Neusa Novaes